Linux Scripts:
DiskBurnInTest.sh (the main script)
DiskBurnInTest_HeadMove.sh (random head movement during the tests)
When my personal 500g main dump disk died an early death a second time in 2016, I wasn't too impressed with what I found for sale. Research showed that most disks were now trash being shoveled on the consumer. Many failed the first week (high infant mortality). While there are disk test programs out there, I needed something a little more advanced that was SMART and error aware and could output speed graphs. That's why I wrote this script. Read below the usage parts (about half way down) to see what turned into a long lecture.
I find it disappointing that I can no longer recommend any brand or series of disk either personally or professionally. The only things I can recommend are to buy cheap and to test often because quality is long gone.
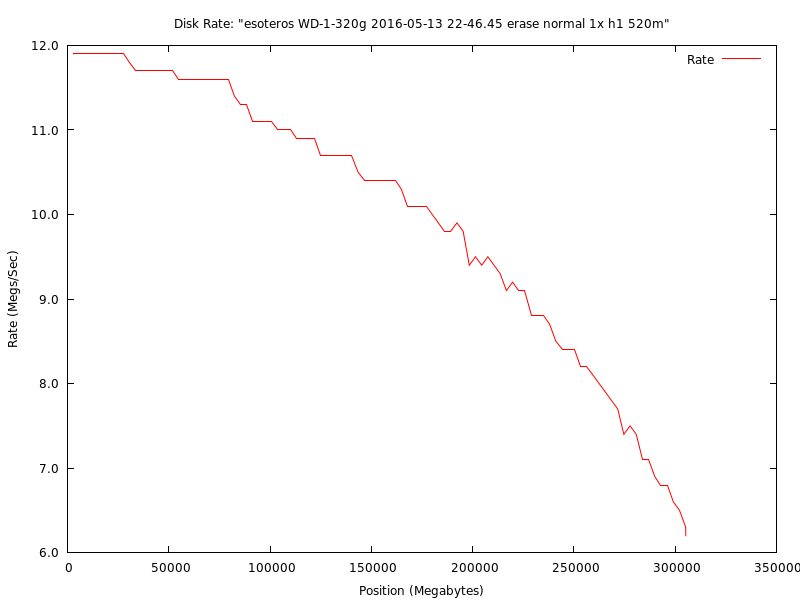
This is an example graph from my first new Western Digital Blue 320g disk in my RAID1. This is what a normal head and rotational platter disk should look like.
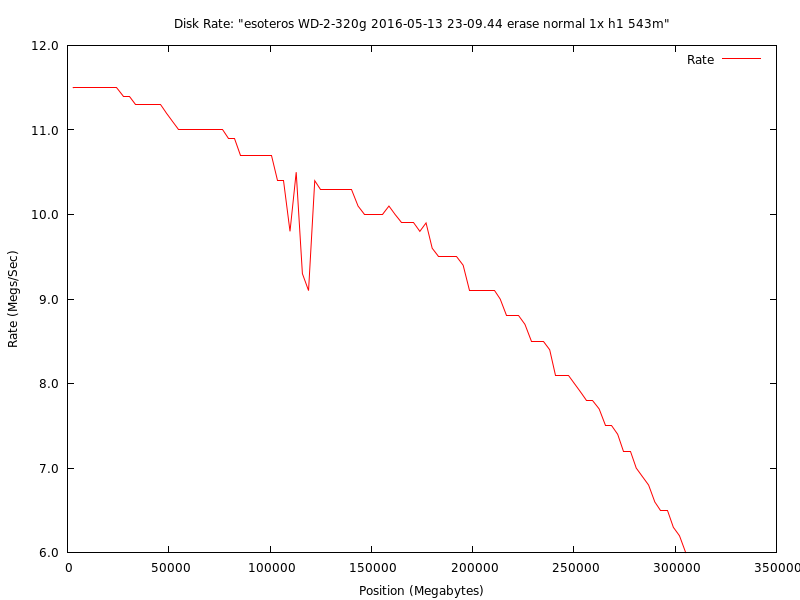
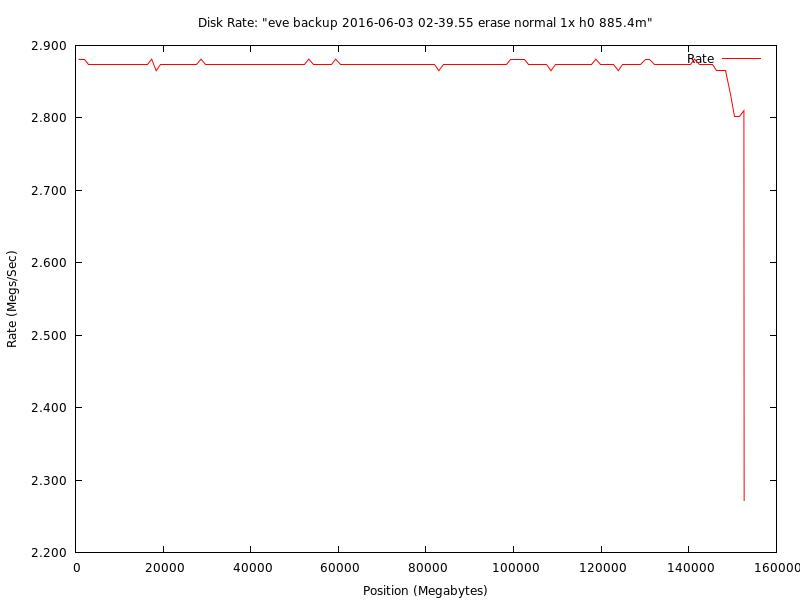
This is an example graph from my second new Western Digital Blue 320g disk in my RAID1. Note the dips just after 100g. This disk should be nearly identical to the one above (they were bought together), but it will probably be the first to show significant problems in just under a year. This is really disappointing for a brand new disk. The Blue series are "supposed" to be some of WD's better disks. I guess not. Note that only the badblocks write with verify tests show this dip. Read only tests are mediocre for showing drive health.
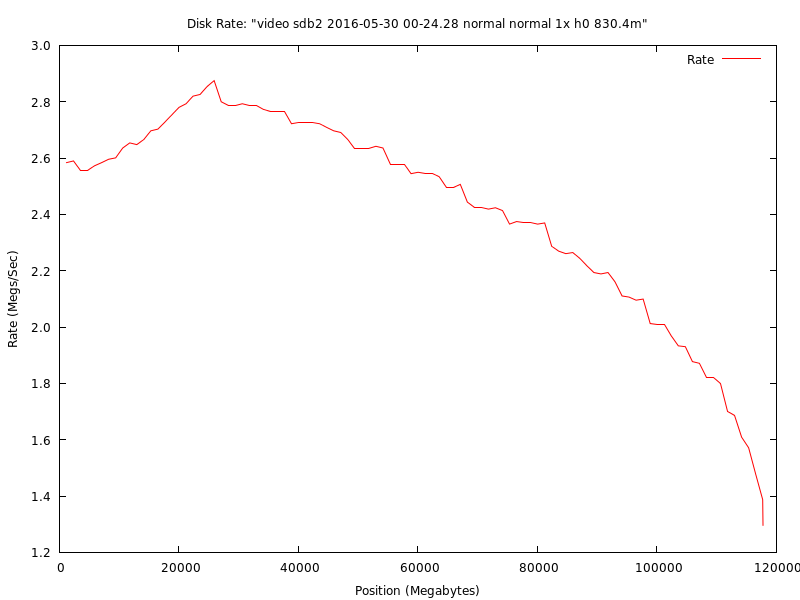
This is the test graph from my DVR's old Hitachi 120g disk (just over 10 years run time at the time of this test). Note how the start of the graph rises, peaks, then falls normally. This indicates some kind of problem at the beginning of the disk. I ended up repartitioning the disk just after the 25g peak point to avoid video corruption problems and to not stress the beginning of the disk. This disk is one of the RMA problems I complain about below. When it came back, Hitachi DFT kept finding small problems and fixing them. I could never get a solid error to send back the disk again, even with several days of continuous testing. Considering how long this disk has survived, it kept going in spite of the manufacturer's stupidity.
This is a test graph from the 1u backup server's 750g Seagate Barracuda disk (3.6 years run time at the time of this test). The 1u was in a coloc for most of its life backing up other servers in the rack. This is another example of the RMA problems I complain about below. This disk was bought shortly after the 750's came out and was expensive. It died an early death and got RMA'd. What returned was this monstrosity. This one always ran slow for some reason. I ran a few passes with SeaTools and everything came back fine, so it got put back into production since the backups were way behind schedule and I had other things I needed to be working on. I don't know how to even interpret this graph. The test ran in 1g chunks, so there are just over 700 data points. Disk internals should interleave the platters, so there's probably something wrong with one of the platters or heads. The drive has never lost data, though. If I would have had this script to generate this graph way back then, I would have called up support and gotten someone fired in the repair division. There's no excuse for something like this. This disk should have never left the repair center. For people who don't believe in quotas and sloppiness, this disk is a prime example.
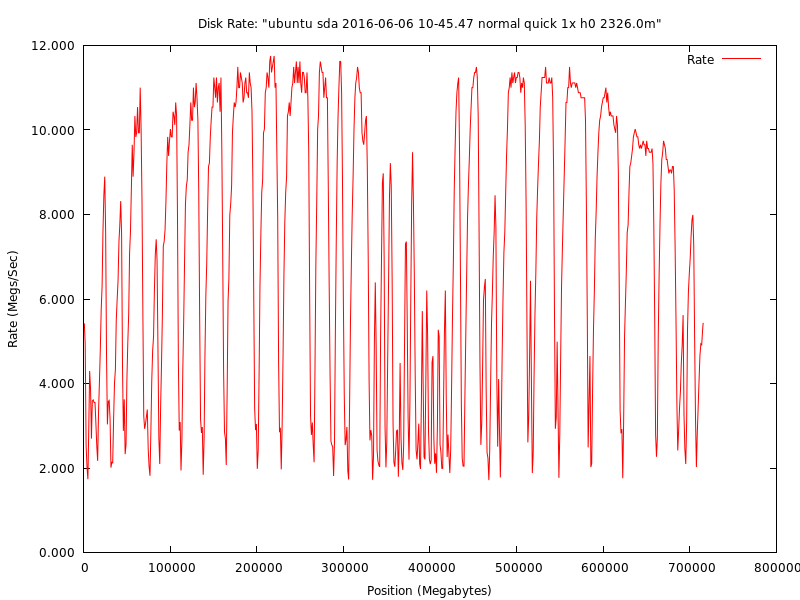
This is one of the backup disks from my personal ancient P3 Xeon offline backup system (the case has a large fan in front of the drive bays, so I kept it around). The speed line is mostly flat because the controller and/or CPU cannot keep up with the disk's speed. Unfortunately, these types of graphs aren't very useful.
Disk Burn In Test usage and manual. Version: 2016-06-08

Usage: ./DiskBurnInTest.sh <options> <disk block device>

Options:
 -?: Show this help text.
 -b dangerous: Enables batch mode. Run this script in normal mode first to make
      sure the options you choose work like you expect. If you enable an over
      write mode, this option will happily blank your disk without any
      confirmation. You have been warned.
 -c #: Change the Block Count. Do not mess with this unless you really know
      what you're doing. Default is 64 blocks.
 -d: Run the disk's built in self tests after all these tests. The SMART
      "standard" is poorly implemented in many disks and this may not work as
      expected or at all. If so, it will error out at the end.
 -D: Skip all these tests and run the disk's built in self tests as "-d" would.
 -e #: Maximum bad block count before the loop is aborted. Default is 0 for do
      not abort and complete the loop. For "dd", the number of "-p" passes will
      be stopped for that loop if the max count is hit.
 -f dangerous: enable "badblocks" force option. If this is used against a live
      filesystem, it will definitely corrupt it. You have been warned.
 -h #: Enable the Head Move script every # seconds. This will move the disk
      head to random positions during the tests to help show any mechanical
      problems. This option will slow down the tests slightly. This option is
      useless on SSD's and the various flash drives. The Head Move Script will
      be recreated each time the script is run if it isn't set to an absolute
      path at the top of this script.
 -k #: Disk Chunk Count. By default the disk is broken up into 100 sections
      (plus a left over if it doesn't divide evenly). On a small and fast disk
      this may make each section fly by too fast for useful statistics. In that
      case, choose a number less than 100 to reduce the number of chunks.
 -K #: Disk Chunks in Megabytes. This is similar to "-k" above except that you
      can specify the chunk size in megabytes.
 -l opt: Test Length. The tests run by the "badblocks" program (-t "normal"
      and "erase") have the option for different lengths. For "dd" tests, this
      value is ignored. Valid choices for "opt" are "quick", "short", "normal"
      (default), "long", or "extended". Write patterns break out into:
      quick: zeros
      short: ones, zeros
      normal: even bits, odd bits, ones, zeros
      long: random, even bits, odd bits, random, ones, zeros
      extended: random, even bits, random, odd bits, random, ones, random, zeros
 -p #: Number of passes inside each loop to run.
 -r #: Resume a test # megabytes into the disk. Given the other parameters, the
      loop block where the megabyte number is contained will be restarted. If
      the "-R" parameter is also used, this number must be less than or equal
      to it.
 -R #: Stop the tests # megabytes into the disk. Given the other parameters,
      the loop block where the megabyte is contained will be the last block
      tested. If the "-r" parameter is also used, this number must be greater
      than or equal to it.
 -s #: Change the Block Size. Do not mess with this unless you really know
      what you're doing. Default is 1,048,576 (1 megabyte).
 -S #: Enables SMART Error Loop that will repeat the current loop block until
      there is no SMART Error reported or the # count is hit. This is for
      annoying disks that have intermittent bad block problems that need to be
      RMA'd but can't until there is a solid error reported by the
      manufacturer's disk test. Be sure to have your data backed up with this
      option as a continual loop on a disk that is going bad will likely kill
      it. If the disk does not support SMART, this option is ignored.
 -t opt: The Loop Type test to run. This controls what program and what test is
      executed on the disk. Valid choices for "opt" are "normal" (default),
      "readonly", "writeinplace", "erase", and "zero". The only option safe to
      run on a live file system is "readonly". All others must be unmounted.
      For "normal" and "writeinplace" tests, your data will be preserved unless
      there is a system crash or power outage. In that case, "Block Size" times
      "Block Count" bytes could be lost. Don't run questionable programs or
      run these tests without a good UPS or full laptop battery charge to be
      safe. In general for any disk test programs, read only and write quick
      without verify tests are a bit mediocre in identifying disk problems. Use
      "normal" and "erase" modes in "badblocks" for more accurate tests. Test
      types break out into:
      normal: runs "badblocks" in non-overwrite mode verifying each pass. Since
         data is preserved, "badblocks" has to first read the data off the
         disk, write the test patterns and verify, and then write the data back
         to the disk. The extra read and write will be a little slower compared
         to "erase" mode.
      readonly: "dd" reads the raw disk and dumps it into /dev/null. Since this
         is a read only test, it is very safe and extremely fast. This test
         depends on the disk internals to verify each block read.
      writeinplace: "write in place" uses "dd" to read a block and then write
         it back in the same place. "dd" does no verification and depends on
         the drive internals for that.
      erase: runs "badblocks" in data overwrite mode verifying each pass. All
         data on the disk will be lost. This test requires the "-w dangerous"
         safety flag to verify you really want to lose everything.
      zero: "dd" writes zeros to the disk wiping out all data. There is no
         verification pass. This test requires the "-w dangerous" safety flag
         to verify you really want to lose everything.
 -w dangerous: Safety flag to enable the "erase" and "zero" loop test types
      that will ERASE and DESTROY any and ALL data on your disk. Undelete and
      data recovery programs will NOT restore your lost data after this. All of
      your data will be TOTALLY GONE! You have been warned. The over write
      modes should only be used on disks that are new and unused, on disks that
      are about to be reformatted, on disks that need to be wiped for security
      reasons, or on disks that need M$ windoze fully uninstalled. The "erase"
      and "zero" modes will not run without this option.

Disk Block Device: This is the path to the disk block device usually in /dev. A
   link can be used for safety or to create a disk label. Example: If I'm
   testing on a live system and /dev/sda is my operating system disk and
   /dev/sdb is my test disk, I'll often create a link by:
      ln -s /dev/sdb /dev/disk/test0
   so I don't accidentally screw up and wipe my operating system drive. If
   /dev/sdb is one of my backup disks and I want a meaningful label, use:
      ln -s /dev/sdb /dev/disk/backup
   All of these tests can also be run on individual partitions instead of the
   full disk.

When this script is first run, it will print out some diagnostic information
about the selected disk. It's a bit messy, but read it carefully to make sure
the disk is correct.

Under that information will be some warnings if problems are found. Pay close
attention to them. Some disks do not support SMART very well, and SMART logging
may get disabled (flash sticks don't support SMART at all). The tests will
still run but without the SMART verification at the end of each loop.

Usage Examples:
   To test the second hard disk in a system using the default options of
   "-t normal -l normal":
   ./DiskBurnInTest.sh /dev/sdb

   To do a regular maintenance test on the main operating system disk and run
   the disk's built in self tests after (do this from a Linux Live CD):
   ./DiskBurnInTest.sh -t normal -l short -d /dev/sda

   To test the first hard disk in a system only using the disk's built in self
   tests (safe to do while the disk is running, "readonly" gets skipped):
   ./DiskBurnInTest.sh -t readonly -D /dev/sda

   To burn in a new disk in the 3rd disk position with no data on it yet, do 3
   passes each loop, and move the head away to a random position every second:
   ./DiskBurnInTest.sh -t erase -l extended -w dangerous -p 3 -h 1 /dev/sdc

   To quickly check a live file system on the first disk and do built in self
   tests after (no unmounting needed):
   ./DiskBurnInTest.sh -t readonly -d /dev/sda

   To test a smaller SSD where the loops go by too quickly in 10 chunks instead
   of 100:
   ./DiskBurnInTest.sh -t writeinplace -k 10 /dev/sda
   or in 10g chunks:
   ./DiskBurnInTest.sh -t writeinplace -K 10240 /dev/sda
   Note that SSD and flash drive have a limited write life. Testing them too
   hard will lead them to an early death. "Solid State" doesn't have the moving
   mechanical parts of "disk platter" based drives, so they shouldn't need
   heavy testing unless they are showing abnormal behavior. Generic flash
   drives (like USB sticks) do not have SMART capabilities, so their reporting
   will be limited.

   To quickly uninstall M$ windoze (that virus infected, spyware magnet, built
   in privacy violator, and all around lousy excuse for a "professional"
   operating system):
   ./DiskBurnInTest.sh -t zero -w dangerous /dev/sda
   And a slightly slower way with verification:
   ./DiskBurnInTest.sh -t erase -l quick -w dangerous /dev/sda

   This script will output a gnuplot file with the runtime stats. If gnuplot is
   installed (on this system or another), to convert the gnuplot file to a PNG
   image, simply run in the directory:
   gnuplot *.gnuplot


-------------------------------------------------------------------------------
Rants, Reasonings, Theory Of Operation, and The Manual
(This part came out long, but it is necessary for understanding.)

Standard Disclaimer. No warranties implied or given. Don't blame me for
you losing your data. Keep backups. Refresh your backups before deep tests
and burn in's. Also use a good UPS (see the write test warning above).
Cheap disks and expensive disks that are really cheap inside can go cranky
very quickly. I've made every effort to make this script stable and
reliable since I use it myself and do not want to lose my own data. That
doesn't mean this script has been written perfectly. That doesn't mean it
will work correctly with every disk and Linux variant under the sun. I
wrote this script for Debian based Linux Live CD variants since that's
what I use, and I don't see many RPM based ones. I've tried to keep the
script general enough that it should work under either, though.

Learning And Testing. This script requires basic Linux experience. This
isn't intended for beginners. This isn't hard, but a careless screw up
could wipe your disk and lose your data. You need to be root to run these
tests. You're going to need to know basic shell operations and how to
identify your disk. This is beyond this script to teach you. You can
easily test this script in a VM with a small virtual disk and booting a
Linux Live CD to see how it handles. An old stand alone computer with a
single test disk works even better. This script is open source and can be
easily checked. I'm not hiding anything. If you find something
questionable, check the source code. It is commented and easy to read.

I chose to write this script not to reinvent the wheel, but to simplify
things and to get a SMART reading for each loop block so I could get an
idea where the errors were happening on the disk. I needed something more
in depth than what the other programs offered. I wrote this script to help
automate disk testing and make it a bit simpler with a standardized
interface presented by the script. I wrote this script because some
manufacturer's test programs cannot see SCSI disks, SCSI cards, RAID
cards, USB storage, and other PCI controllers.

I wrote this script to help find new disks that were bad (infant
mortality) and weed out disks made with poor manufacturing practices. Any
new and capable disk should easily handle all these tests. These burn in
tests are designed to find a disk failure within the easy return period
after buying a new disk. During this period it is easier to take it back,
swap it out, get another size, or get another brand. The intent is to not
be stuck with a bad design and have to constantly fight with the
manufacturer's warranty RMA's, endless return shipping costs (they count
on you not wanting to pay this), and problems for the life of the
warranty.

I wrote this script to push semi-failing disks that the manufacturer's
drive tests keep fixing and refuse to mark as bad even though they're
clearly dying and needed to be RMA'd. I've been a victim of a few of
these. I've also been a victim of return RMA's that still had problems and
kept trying to fix themselves even though they were clearly defective.

It's really sad how disk quality keeps getting worse and worse over the
years. The manufacturers only care about cutting corners and increasing
profits. It's pathetic how manufacturers use their warranty as a profit
center this way as many people won't take the time or effort to RMA a bad
disk. Many people / operations / data centers don't want or can't receive
a used disk in return (receiving a used disk for a new one is criminal).
This just encourages bad behavior and more sloppiness that I consider to
be fraudulent. It's awful how data center / enterprise level disks use the
same lousy designs with a new label slapped on them... like a special
sticker on the disk will make it superior in some way.

These tests are designed to push a disk for a burn in, not burn it up to
destruction. If a disk passes the tests, I want it to keep my data, not
break it and cause an early death. It's like taking someone out for a run,
not dragging them behind the car on the highway. If you modify this script
for "highway" use, don't mention it and don't mention me. Say you came up
with the destruction all on your own. Needless destruction violates the
spirit and intention of this script.

"1000 vs 1024" or "Base10 vs Base2". While on the subject of bashing
manufacturers, back in the old days, all disk drives used to have their
size listed in true megabytes... as in a base2 numbering system. Then one
day, some idiots in sales&marketing decided to change the disk numbering
world to compensate for their "overly small products" (insult intended).
This took a complicated topic and made it even more complicated to satisfy
their tiny egos. Disk controllers and interfaces are small computers and
all computers use binary (base2) numbers. Any rounded decimal numbers
(base10) are semi-emulated (to keep this description simple for
non-admins) by computers for humans and not native for their calculations.
All the calculations done in this script are done for binary boundaries.
Choosing base10 numbers for these calculations will cause you problems and
headaches. People who choose to use those damned "mibi" and "kibi"
notations can go shove them where the sun don't shine (insult intended).
One megabyte isn't redefined as 1 million bytes, it's 1,048,576 bytes...
because that's what the computer, the controller, and the disk needs. If
this is used in an index, that number will be one less because counting
starts with 0 instead of 1. Unfortunately the "dd" program used in some of
these tests counts in millions instead of mega when given the rate per
second. This makes the numbers look faster than what they are in base2.
Keep that in mind before complaining about the CSV rate logs.

Test your computer. While I was researching for this script, I came across
a few accounts of bad computer hardware causing data corruption during the
disk tests. Many people falsely blamed it on something else. If you have
bad RAM and the disk test program writes the data you want to keep to that
RAM buffer so it can be written back at the end of the pass, that data
just became corrupted. Since the disk test program will use the same
buffer for all the blocks, everything you have just became corrupted. This
applies to ALL disk test programs that operate as I just described. None
are immune. This is why I recommend testing hardware BEFORE doing any in
depth disk tests. I also recommend testing all hardware (especially brand
new) on a regular basis as computer manufacturers have been getting just
as sloppy as disk manufacturers.

UltimateBootCD.com (UBCD). This is a nice consolidation CD of many
computer diagnostic tools and various utilities. You can fetch the various
independent tools if you want, but my instructions will reference UBCD.

RAM Test. UBCD: Memory / memtest86. Let this run for 24 hours. If there is
a bad RAM stick, it will usually show up almost immediately. It usually
won't catch anything intermittent until after 12 hours. Any bad RAM sticks
either get RMA'd if still under warranty or go in the trash. No arguments.
Memtest will also catch bad and poorly designed motherboards, so some
extra testing should be done if it shows problems.

CPU, RAM, and Motherboard Test. UBCD: CPU / Mersenne Prime Test (highest
version that will boot). This is often referred to as MPrime. This does
complex math calculations that will show if something is broken. While
UBCD lists this as a CPU test (which it mostly is), it will also show
problems with RAM and the motherboard like memtest. This program found a
RAM problem in my first quad that memtest passed. If MPrime finds errors,
trace down the problem. If hardware is bad, it gets warrantied or goes in
the trash. No arguments.

Manufacturer's Disk Test. UBCD: HDD / Diagnosis. In the menu, pick the
brand of disk that you have. I usually recommend running the
manufacturer's test after running the burn in tests and the disk self
tests. This will do custom diagnostics on the disk that cannot be done in
Linux. If there are problems in the disk queue, it will flush them out. If
you're reading these instructions and this script sounds like too much for
you, run HDAT2 and then this test and ignore this script.

HDAT2 Disk Test. UBCD: HDD / Diagnosis / HDAT2. If this script is too much
for you or you just want a second opinion, HDAT2 is a good choice. I
periodically recommend this to friends and clients because of its
simplicity compared to my script. Select your hard disk from the list,
select "Device Test Menu", select "Detect and fix bad sectors menu", and
select "Fix with Read/Write/Read". This test can take several hours
depending on the disk size. Since this test writes to the disk but keeps
your data, the same power outage warning applies as above.

Linux Live CD's. In writing this script, I kept most of the functions in
mind for use with a Linux Live CD. This is the recommend way of disk
testing for most systems as the operating system disk cannot have an in
depth test while that operating system is running. This also allows
windoze users to check their hard disks since these tests only access the
disks on a low level and could care less about the file system and
operating system. If you're running a Linux system and boot to a Linux
Live CD, be warned that the hard disk order will tend to move around. Be
careful and make sure you're testing the disk you really want to test.
That's why the diag print out is first printed along with so many other
warnings.

Protecting Other Disks. If you are new to all this and unsure which disk
you really want to test, shut your computer down and UNPLUG EVERY OTHER
DISK in your system. Only leave the disk you want to test plugged in. If
your important disks are unplugged, this program (or any other program)
cannot wipe them and destroy their data. Having a separate computer with
no disks except the disk you want to test plugged in is also a good idea.
This can be left in the corner of the room for days as the disk gets a
deep test. I find it very scary to do irreversible disk operations in a
live system that could instantly destroy it and lose all my data. You
should, too. That's why the diag print out is first printed along with so
many other warnings. That's also why I mention unplugging or using a
separate computer.

Test Run Times. Depending on the test type, disk size, and disk speed, the
test can run for several hours to several days. A new disk should be run
for at least a few days with a few passes. If you have a test you like but
it ends before then, increase the number of passes per loop to stretch it
out. I usually run the "erase" test on my new disks. I also prefer to run
"zero" and "readonly" to get some benchmark times to compare the disk
later in its life. A regular maintence test shouldn't take more than a few
hours. The idea is to make sure it still works correctly but not to run it
too hard. If a disk is acting up, back it up and run a deeper test.

After this script's tests, I'll run the disk's built in self tests using
"smartctl" with "-t short", "-t long", and "-t offline". I've combined
these tests with the "-d" option. It may or may not work very well
depending on what the drive supports and reports. The first 2 test status
can be seen with the "smartctl -c /dev/disk" option under "Self-test
execution status" (some disks only show this with "smartctl -a
/dev/disk"). The "offline" test does it's own thing and can take about the
same time as the "long" test. There is no status update on it besides the
original estimated end time when it first runs. To finish the testing
round, I'll use the manufacturer's test disk (see UBCD above) as a final
pass to flush out any queued problems that got stuck in the disk's
controller. Yes, a full battery of tests will take a very long time. If
you want to make sure your programs and data stays safe, there is no fast
"cheat" path.

Warning from a real world problem I've seen: Excessively pushing a disk
that's near failure over and over may kill the entire disk and shut it
totally off. Some disks don't handle end of life errors very well. Use the
deep tests with caution. Always back up a disk like this before pushing it
that far.

Estimated Time Function. The estimated time to finish function cannot take
into account the disk slowing at the end. This is natural for all platter
based hard disks. They can cut their transfer rate as much as half. It
will add about 25% longer than the first estimate at Loop 0. SSD's and
flash drives shouldn't have this problem.

The "badblocks" and "dd" programs are mixed because "badblocks" is much
faster than "dd" at writing and verifying non-zero patterns. "dd" is good
for generic tests and very fast wipes. Note that if "dd" hits a range of
bad blocks that cannot be fixed, it may abort early and not check the rest
of the loop block.

RAM Resources. To run this script using the "dd" tests, you'll only need a
couple of extra megabytes of RAM. "badblocks" will need much more. For the
"erase" test, you'll need 2 * "Block Size" * "Block Count". Since 64megs
is the default value, you'll need 128megs of RAM. For the "normal" test,
you'll need 3 * "Block Size" * "Block Count". Since 64megs is the default
value, you'll need 192megs of RAM (the extra 64megs is for the save data
buffer). For most modern systems, this won't be a problem. On a memory
limited system, change "Block Count" to 32, 16, or 8 ("-c 32" or "-c 16" or
"-c 8"). These numbers will keep the proper binary boundaries and not slow
down the tests too much.

Test Buffer Sizes. I've heard some people argue that the test buffer sizes
mentioned above should be larger than the onboard disk cache. This is not
true with direct write tests. All the tests in this script are direct
write. None use any RAM caches. While doing the tests, I've watched the
drive light. It flashed constant as expected.

The Disk Log. Its name format is "Hostname_DiskDevice_Date_Time.log".
Under normal circumstances, a small subset of what's displayed on the
screen will be entered into the log with the INFO header. If a SMART
problem is detected, "badblocks" or "dd" exits with a non-zero return
code, or the kern.log shows a searchable entry, an entry will be made with
the ERROR header. Note that hitting CTRL-C to abort out of a test will
make "badblocks" and "dd" return a non-zero return code on some systems.
This will create a false log entry that should be deleted unless you
killed the script because it was hanging badly and there really were bad
blocks. Also note that every entry for a particular disk cannot be grep'd
for from kern.log. If you're tracking down intermittent problems, use the
date stamp and go back to kern.log to see the full entry.

For long term reference, this script will output up to 3 "smartctl --xall"
logs. The first is before the loops start showing the initial drive
condition. This second is after all the loops have run. The optional third
is after the "long" built in self test. These last two will show any
changes and built in error logs if the drive supports it.

This script will watch 4 block related SMART parameters for errors. Each
one of these will indicate a new problem or show the count of past
problems. Most of the SMART parameters are dumb and not very useful for
showing drive health. These 4 parameters are important for the tests in
this script. Not all disks have these 4 parameters. A missing parameter
will be ignored. If the disk doesn't have any of these 4 parameters, SMART
monitoring will be automatically disabled with a warning printed.
5 Reallocated_Sector_Ct
196 Reallocated_Event_Count
197 Current_Pending_Sector
198 Offline_Uncorrectable

On a side note, "10 Spin_Retry_Count" is useful to see if a disk's
mechanics has started to fail. It doesn't have anything to do with bad
blocks, so it isn't monitored by this script.

The CSV Log. This log contains statistics on how fast the test performed. The
first number is the loop count. The second number is megabytes/second. The
third number is the end of the loop block in megabytes. To find the
beginning of the loop block, add 1 to the previous entry. The file name is
in the format of
"HostName_DiskDevice_Date_Time_TestType_TestLength_Passes_HeadMoveTime_
TotalRunTime.csv". I chose that long name so I'd know where, when, and what
type of test was run on the disk. I also added a gnuplot file derived from
this data. If gnuplot is installed, it will output a PNG file. If not, the
gnuplot file is self contained and can be copied to another computer with
gnuplot. Run it with "gnuplot FILE.gnuplot" or see below for batch
processing. I recommend keeping the CSV and PNG files and comparing them
to earlier and later tests as a simple indicator of disk health. If this
script is being run from a Linux Live CD, save them to a USB stick or a
network share. If one of the loop blocks has a noticeably slower rate than
the adjacent blocks, that's a good indicator that there is a problem
within that loop block.

If the gnuplot files are properly formed (like mine), it is easy to
execute them all at once:
gnuplot *.gnuplot
For reference, executing gnuplot files one at a time in batch mode:
ls *.gnuplot | xargs -l1 gnuplot
or
for sFile in `ls *.gnuplot` ; do gnuplot ${sFile} ; done

Note that the rates in the CSV log won't be very accurate if each loop
pass only takes several seconds or less to run. Standard shell scripts can
only measure time in whole seconds and this limits the rate resolution
calculations. Use the "-k" or "-K" options to decrease the number of loop
passes to help solve this. Ideally each loop should be 2-5 minutes.

Disk speeds reported at the end of each loop are for how fast the disk got
through that loop, not how fast the individual reads/writes were inside
the loop. It is not an actual speed unless using "readonly" or "zero"
tests in one pass. The "badblocks" program will have multiple reads and
writes and will show up much slower. If the disk isn't having any
problems, it is still operating just as fast as a single pass with each
read and write operation. Just keep in mind that multiples will slow down
the apparent performance. The number of passes option will do the same
thing.

For long term reference take pictures or scan the disk and labels when you
first get the disk. It is much easier to dig out a picture than to pull out
a disk for model, serial number, manufacturing batch, etc.

Needed Programs Installed. Most Debian based Linux Live CD's will have
most of the programs needed to run this script already installed. The
smartmontools package (and gsmartcontrol for a visualized SMART log) is
usually left out, though. This script will check for the needed programs
and print the missing ones if there are problems. Debian based installs
can use the command below to install the missing pieces. RPM based
installs will have something similar.
# sudo su ; apt-get update ; apt-get -y install bash bc coreutils e2fsprogs
gnu-fdisk grep hostname mount procps sed time util-linux smartmontools
gsmartcontrol

A warning about SSD and flash partition boundary alignment. This is a way
more complicated topic than will be covered in this script, but you need
to be aware of it. If this script is given a raw disk device and not a
partition on that disk, starting at the very beginning, it should be very
fast using the default values. If you give this script a partition on the
same disk and it is much slower, then the partition alignment is off. Be
careful changing the "Block Size" and "Block Count" options as that could
really screw up performance. The default values and optional ones I've
given above should work 99% of the time. Changing those values to
something non-standard could really screw up performance. The access is
slow because the disk is writing across 2 blocks instead of 1. This
causes a lot of needless wear and tear on the flash internals. If you run
into this problem, do a web search on the terms "flash partition boundary
alignment". Your device will need to be repartitioned with the correct
numbers. Sometimes these calculations are easy, sometimes not. Once
completed, this script should run at the same rate as the raw disk device
and a partition on that disk. Also note that some file systems can also have
block alignment issues, but this script does not operate on the file system
level. Technically head and platter based hard disks can also have partition
alignment issues along with the file system chosen, but it's much less
pronounced.

To wrap this up, let me make some comments about the arrogant stupidity of
disbelievers in testing. If this doesn't prove it for you right in front
of your own face, then there's no hope for you. Please stop polluting the
world with your arrogant stupidity. Real admins know better. Ignorant
users just shoot their mouths off trying to sound intelligent and
important. I've waded through a lot of that stupidity researching various
disk testing methods for this script. If you're one of those users
offended by this paragraph, do me and everyone else a favor by not using
this script and going far away. You don't want to hear me and the rest of
us don't want to hear you. Admins and hardware guys with a lot more
experience than me believe in testing because they've learned the hard
way. It's not difficult to do a web search to see what they say. If you're
one of those detestable people known as a "fake reviewer", please go jump
off a tall building. Lots of people have lost important and sometimes
irreplaceable data from your lies, not to mention wasted salvage and replace
time from a lousy product.